North Pole Dirt Cake Cones
Are you looking for something different to do with your kids for Christmas or even during school break? Well, how about these treats. There is no baking involved and they are easy to assemble. Everything is edible except the sign.

I have always loved dirt cake. In this one I got to use my Candy Cane Oreos. I don’t remember if I bought them at Walmart or Target, but they sure taste good. Don’t worry, you’ll have a few left over so you can taste them too.

I chop mine up in a food processor, but you can place them in a large Ziplock bag and have the kids crush them with a rolling pin. The filling is just a lot of mixing, which can all be done by hand so the kids can help. Have them whisk the pudding mix and milk instead of using a hand mixer. It will help tire them out.

Normally I mix 2 cups of milk to make the pudding, but I wanted to add some eggnog. First I tried making the pudding with eggnog, but it didn’t take. So on my second try I made the pudding with 1 1/2 cups milk and let it set in the fridge. Once it was set, I added the 1/2 cup eggnog and it came out fine.

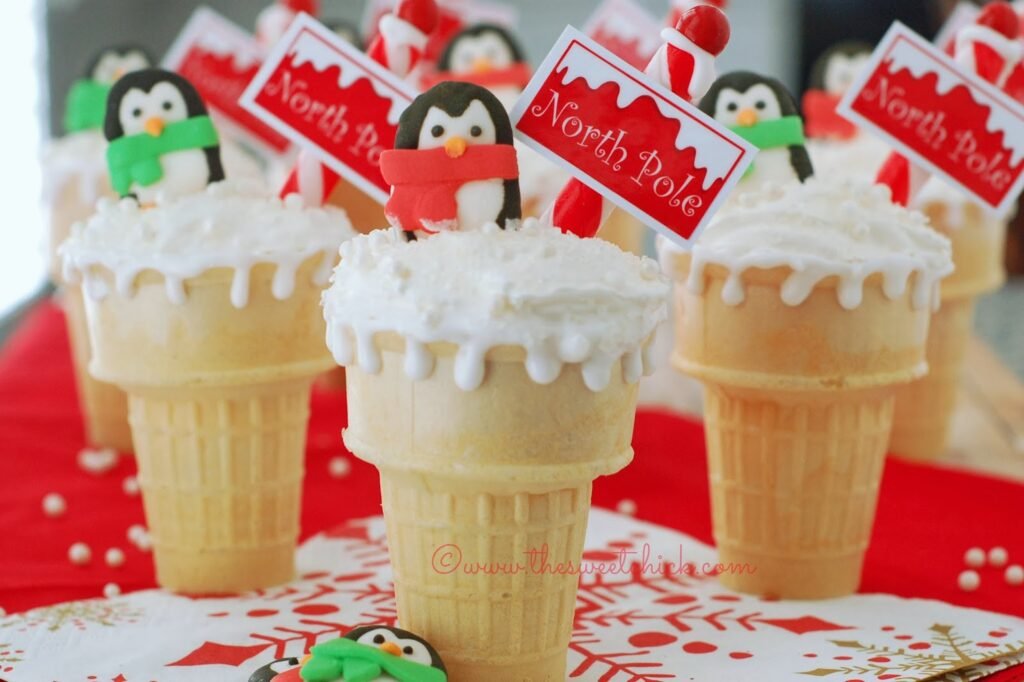
I think I am single-handedly keeping Wilton in business this holiday season. I can’t stop buying their stuff. Tell me these penguins are not adorable. And the North Pole Decorating Kit has everything I need included, the candy cane pole, the sign, and the snow glitter. I found these at Walmart by the way.

Before assembling my cones, I just wanted to add one more thing to the poles. I found these holiday Sixlets at the Dollar Tree, they were perfect for the top of the pole. I just glued them on with cookie icing. You can also use red M&Ms if you like. The north pole signs that come with the kit are stickers. I wanted to make them more sturdy, so I stuck them on some white card stock and cut around it to give it a white edge. I glued those on with cookie icing also.


If you don’t want to buy the kit, you can make your own signs with a paper straw, some white and red card stock and a red glitter pen. You can still glue the Sixlet on top with cookie icing.


To fill the cones, I started with the crushed Oreos at the bottom, about a tablespoons worth. Then I topped it with a tablespoon of cream filling. Then another layer of Oreos and a final layer of cream filling.


I smooth out the top, then it was time for the frosting. For a little extra detail you can use some cookie icing around the rim of the cone to make some icicles before you add the frosting.


For the frosting, I didn’t want anything heavy, so I used Cool Whip frosting. I just spread it on with a spatula. I had these Wilton, white sugar pearls in the pantry so I added them with the other glitter sprinkles to resemble snowballs. Then I added the pole and the penguin.
Come on, what kid wouldn’t like to eat one of these? The only thing about these treats is that you have to eat them right away, or the cones with start to get soggy. After I made mine, I walked down the street and handed them to all the kids. They were gone in no time at all. We have a lot of kids in the neighborhood. (Ok, I did eat one before I left.)
You can eat the filling first with a spoon, then eat the cone or you can just bite into it all at once with no spoon at all. It may be a little messier, but definitely fun!
North Pole Dirt Cake Cones
by The Sweet Chick
Prep Time: 30 minutes
Keywords: no bake dessert snack cream cheese cool whip vanilla pudding Candy Cane Oreos Christmas trifle dirt cake American winter
Ingredients (24 cones)
- 25 Candy Cane Oreos
- 4 oz. cream cheese, softened
- 2 tablespoons butter, softened
- 1/2 cup powdered sugar
- 1 package (3.4 oz.) instant vanilla pudding mix
- 1 1/2 cups milk
- 1/2 cup vanilla eggnog
- 1 cup Cool Whip whipped topping, thawed
- 1 container (10.6 oz.) Cool Whip vanilla frosting, thawed
- 24 ice cream cups (flat bottom)
- 2 Wilton North Pole decorating kits
- 2 Wilton Penguin Icing Decorations kits
- 24 red Sixlets (or M&Ms)
- 1 package (7 oz.) Betty Crocker Cookie Icing (white)
Optional
- 1 container (5 oz.) Wilton’s White Sugar Pearls
Instructions
Chop Oreos in a food processor until they become a dirt like consistency or place them in a Ziplock bag and crush them by hand with a rolling pin. Set aside.
In a small bowl, mix together the cream cheese, butter and powdered sugar until smooth. Set aside.
In a large bowl whisk together the milk and pudding mix until pudding mix dissolves. Place bowl in fridge for pudding to set. (It will be a thick consistency)
Once pudding is set, add eggnog and mix well. Then fold whipped topping into the pudding until well blended.
Next add cream cheese mixture to pudding mixture and mix until fully incorporated. Place in fridge while you assemble the poles.
Unwrap each candy cane pole in the kits. Add a little dab of cookie icing to the tops of the poles and place a red Sixlet on top. Try to place the poles upright until the cookie icing sets.
Take each North Pole sticker and adhere it to white cardstock. Cut out by hand, leaving a small white border around each sign. Place a small dab of cookie icing to the back of the cardstock and adhere it to the pole. Place upside down on flat surface until it dries.
Set cones on a flat surface. Add 1 tablespoon crushed Oreos to the bottoms of each cone. Then add 1 tablespoon cream filling and another tablespoon of crushed Oreos.
Press down slightly with a spoon before adding the final tablespoon of cream filling. Smooth the filling with a spatula before adding the frosting.
If you want, decorate the tops of each cone with some cookie icing to resemble icicles.
Then with a spatula, frost each cone with the Cool Whip frosting. Sprinkle with the glitter sprinkles included in the kits. If you want you can also add some White Sugar Pearls to resemble snowballs.
Place a candy cane pole into the tops of each cone. Add a candy penguin to each cone by pressing them gently into the frosting.
That’s it! You are done. Dig in!
Churro Macarons


Who else but me would combine Spanish and French desserts into one tasty treat. Ever since I made my Conversation Heart Macarons, I have been thinking up other crazy macaron flavors. With Cinco de Mayo around the corner, I thought a churro flavor would be appropriate. I’ve made Churro Cupcakes, Churro Crepes, Churro Donuts, Churro Puff Pastry, so why not in a French macaron form. Trust me, you are going to like these.

There are really not a lot of ingredients for these macarons, but they do take a bit of time and patience to make. You have to measure, sift, whip, and let sit 30 minutes before you even put them in the oven. They are not an everyday treat, but are great for special occasions. They can be made ahead of time and kept in the fridge.

Even though it has cinnamon on the inside, I wanted the macaron to have a coat of cinnamon sugar on the outside. To adhere the sugar, I used a simple glaze. For the filling I was going to do just dulce de leche, but it was a little to rich for me, so I had to come up with another idea. I found a recipe for dulce de leche buttercream that worked out well. It is so good, I just wanted to eat it with a spoon. Of course that wasn’t enough. I still wanted the taste of pure dulce de leche in the macaron so I first added a thin coat of dulce de leche, then topped it with some buttercream before smooshing the two macarons together.

Now I know at this point all you want to do is eat one, but again you have to wait. These Churro Macarons need to sit in the fridge at least 24 hours to acquire their delicious flavor. I tried one on the day I made them and they were a bit hard, but by day 2-3 they were just right. The shell was crunchy and full of cinnamon sugar flavor. The inside of the shell was soft and chewy and the filling was amazing. I will say they are on the sweet side, but these are to be savored not chowed down like a pack of cookies. These are perfect with a cup of coffee, espresso, or cappuccino. Each bite is to be eaten slowly and enjoyed thoroughly. I just ate another one while writing this post and it still tastes phenomenal on day 5. These macarons were totally worth the effort.
Churro Macarons
by The Sweet Chick
Prep Time: 2 hours
Cook Time: 10-13 minutes
Keywords: bake dessert snack cinnamon dulce de leche egg whites almond flour Cinco de Mayo macarons French Mexican spring
Ingredients (30 macarons)
For the macaron
- 7 oz. powdered sugar,divided
- 4 oz. almond flour/meal, sifted
- 1/2 teaspoon cinnamon
- 4 large ( 4 oz.) egg whites, room temperature (I used 4 oz. egg whites in a carton)
- 3 1/2 oz. granulated sugar
For the topping
- 1/2 cup powdered sugar
- 1-2 tablespoons milk
- 3 1/2 teaspoons cinnamon sugar (store bought or homemade)
For the filling
- 1/2 cup unsalted butter, room temperature
- 1 cup powdered sugar
- 1/4 teaspoon salt
- 1/4 cup + 5 tablespoons dulce de leche
Instructions
For the macaron
Prepare circle templates (1 1/2 inch circle, 1/2 inch apart) and line baking sheets with parchment paper, placing template under parchment.
In a food processor, pulse 1/3 of the powdered sugar and all the almond flour to form a fine powder. Then sift sugar mixture 2 times.
Sift remaining powdered sugar 2 times also. In a large bowl combine almond flour mixture, remaining powdered sugar and cinnamon.
Add egg whites to stand mixer bowl with whisk attachment. Whisk whites on medium speed until foamy. Then gradually add the granulated sugar. Once all sugar is added, scrape down the sides of the bowl. Increase mixer speed to high and whisking until stiff, firm, glossy peaks form.
Next sift the powdered sugar mixture 1/3 at a time over the egg white mixture and carefully fold using a large silicone spatula until mixture is smooth and shiny. Repeat process for the remaining 2/3 of the powdered sugar mixture.
Place the macaron mixture into a piping bag with a round tip ( I used Ateco # 804). With piping tip 1/2 inch above the template , pipe 1 1/2 inch circles onto parchment paper lined baking sheets. Once finished gently tap baking sheet on your work surface to release and air bubbles and help form the “feet” of the macarons.
Let macarons stand at room temperature for 30 minutes. (Go read a book or surf the web.)
During this time, preheat oven to 375°F. Macarons will be ready to bake when they no longer stick to your finger when lightly touched. (Do not forget to remove the template paper before baking.)
When ready, bake the macarons at 375°F for 10-13 minutes (Keep an eye on them so they don’t burn). Rotate baking sheets halfway through to promote consistent baking. Macarons will be ready when they are crisp and firm.
Remove from oven and let cool for 2-3 minutes. Then carefully remove the macarons from parchment paper and place on a wire rack to cool completely.
For the topping
In a small bowl, whisk together the powdered sugar and milk to a thin spreadable consistency.
Brush the tops of each macaron with a light coat of glaze and sprinkle with about an 1/8 teaspoon or less of cinnamon sugar each.
Set aside and let the glaze dry.
For the filling
In a stand mixer, beat the butter until fluffy.
Add the powdered sugar and salt and mix until well combined.
Then add 1/4 cup dulce de leche and mix until fully incorporated. Place the mixture in a piping bag or Ziplock bag with the tip cut off.
Using the remaining dulce de leche, spread on thin layer (about a teaspoon or less) on half the macarons.
Then over that, pipe on a bit of the dulce de leche buttercream.
Place the remaining macarons over the filled ones and carefully sandwich together.
Place macarons in the fridge and wait 24 hours before eating. (I know it’s torture, but you can go lick the bowl of buttercream instead.)
Notes
Macarons can be kept sealed in an airtight container up to 1 week in the fridge.
McCormicks does sell a premade cinnamon sugar mix, but if you want to make your own, you can find my recipe here.
For the dulce de leche, I used Gaucho Ranch brand that I found at World Market. I like it because it is thick.
Macaron recipe adapted from Sur La Table Mango Macarons
Dulce de Leche Buttercream Frosting by Cupcake Project
This recipe may be shared at these fabulous link parties.