
Peppermint Eggnog Fudge

Medically reviewed by Christiana George Updated Date: June 9, 2023


I hope everyone had a wonderful Thanksgiving holiday. We spent ours with some kind and generous neighbors this year. There was a ton of food and all of it was delicious. My plate was quite full. I also was able to get my Christmas tree up and decorated while my husband decorated outside. To get myself in the full Christmas spirit, I whipped up a batch of this Peppermint Eggnog Fudge. There’s nothing better than combining two of the most popular holiday flavors for a creamy, smooth fudge that fills your mouth with delightful mintiness.
These Andes Peppermint Crunch baking chips are the best. I just eat them straight out of the bag. They are great to bake with because they melt so smoothly.

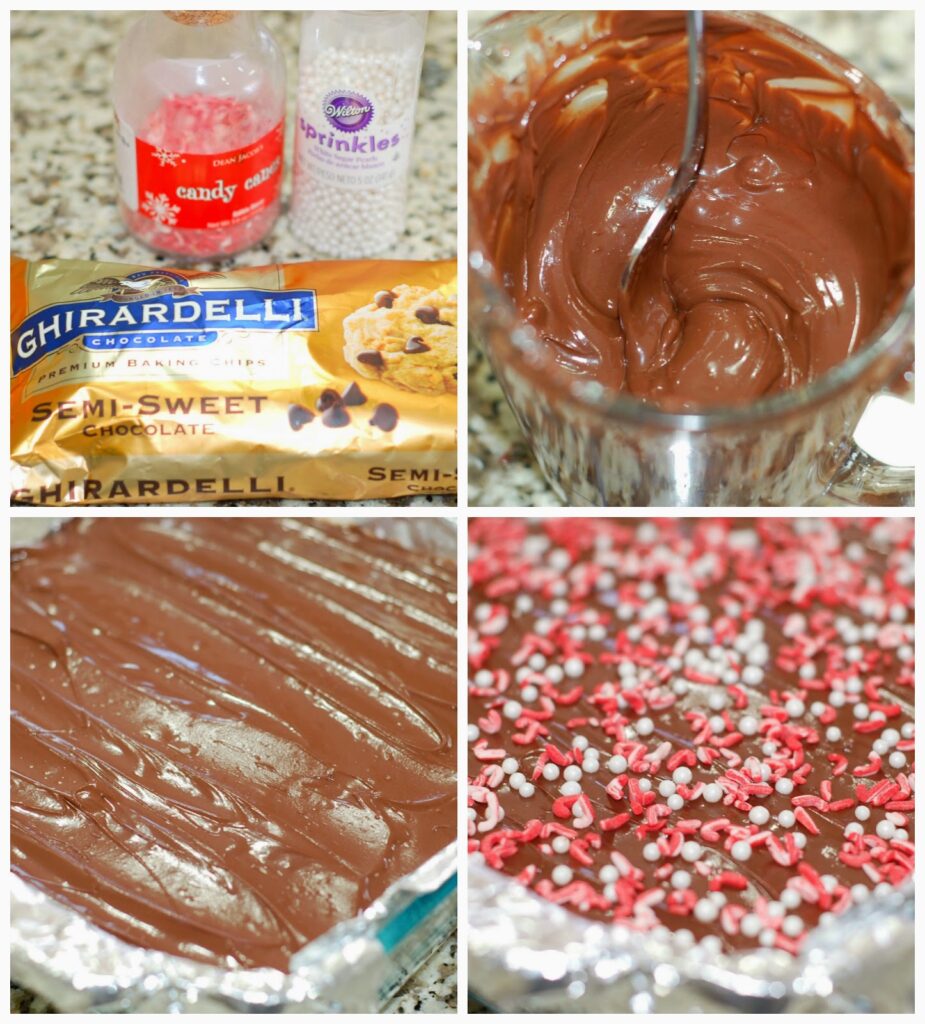
The fudge comes together pretty quickly. It just requires a little stove top work. Nothing to be scared of. You can just add sprinkles and leave the fudge as is or you can add another layer of goodness with some melted chocolate.
Now doesn’t that look good. I even added some peppermint flavored candy cane sprinkles to finish it off. Chocolate and peppermint go together so well.
The fudge came out with a perfect peppermint flavor with a hint of eggnog. The eggnog made it smooth and creamy while keeping the peppermint from becoming overpowering. My candy cane loving kids, husband, and neighbors loved it. However, this Peppermint Eggnog Fudge is better than candy canes because it melts in your mouth without sticking to your teeth.
Peppermint Eggnog Fudge
by The Sweet Chick
Prep Time: 20-25 minutes
Cook Time: 10-12 minutes
Keywords: stove top dessert snack peppermint egg nog marshmallow fluff chocolate Christmas fudge candy American winter
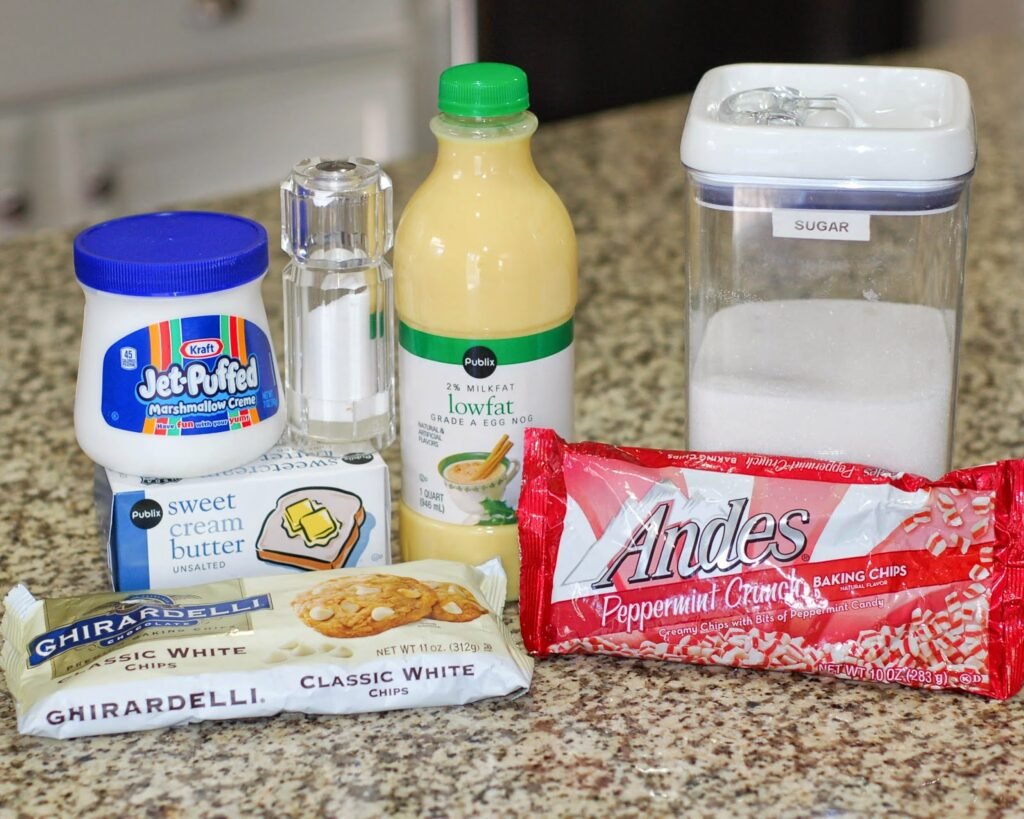
Ingredients (30-40 squares)
For the fudge
- 2 cups sugar
- 1/2 cup unsalted butter
- 1 cup eggnog
- pinch of salt
- 11oz. package white chocolate chips
- 7 oz. jar marshmallow fluff
- 1 cup Andes Peppermint Crunch Baking Chips
For the topping
- 1 cup semi-sweet chocolate chips
Instructions
For the fudge
Line a 8 or 9 inch square pan with aluminum foil and spray foil with a non-stick spray (I used Baker’s Joy).
In a medium saucepan mix together the sugar, butter, eggnog and salt. Bring to a rolling boil, stirring constantly.
Continue boiling 8 to 10 minutes over medium heat or until a candy thermometer reaches 230°F. Don’t forget to stir constantly to prevent scorching.
Once the temperature has been reached, remove from stove-top. Quickly add in white chocolate and peppermint baking chips. Stir until chocolate and baking chips are melted and smooth.
Then stir in marshmallow creme. Beat until well blended and then pour into prepared pan. You can use a spatula to smooth out the top if it doesn’t spread evenly.
Place fudge in the fridge for about 15- 20 minutes to cool and set completely.
For the topping
Once fudge has cooled, melt your chocolate chips according to instructions on package. (I like to use Ghirardelli chocolate chips because they melt easily and smoothly in the microwave. Other chocolate chips you have to melt in a bowl over boiling water on the stove-top.)
Pour the melted chocolate over the fudge and spread evenly with a spatula.
Add sprinkles to the top.
Place fudge back in the fridge for chocolate to set. Once chocolate sets, cut fudge into squares with a sharp knife.
Grab some hot cocoa with your fudge square and enjoy!
Notes
I melt my chocolate chips in a glass measuring cup in the microwave. Therefore, it’s easier to pour over the fudge.
I kept my fudge in an airtight container in the fridge, but I also placed some squares in the freezer for a week and it came out tasting just the same. Perfect for making ahead for Christmas gift packages.
Recipe adapted from Eggnog Fudge by Recipe Girl
Related Posts


Subscribe for New Racipies
Get mental health tips, updates, and resources delivered to your inbox.
Is Apple Cider Safe for Acid Reflux?


Apple cider, cherished for its sweet and tangy taste, is a versatile beverage enjoyed both as a drink and in culinary recipes. Beyond its flavor, apple cider is often linked to various health benefits, including digestive support and immune-boosting properties. But when it comes to acid reflux, a condition characterized by the backward flow of stomach acid into the esophagus, the safety of apple cider becomes a concern. Can apple cider be part of a reflux-friendly diet, or should it be avoided altogether?
This article explores the acidity of apple cider, its potential effects on acid reflux, and practical tips for its safe consumption. Whether you’re a fan of its flavor or curious about its impact, this guide will help you make an informed decision.
Understanding Acid Reflux
Acid reflux, also known as gastroesophageal reflux, occurs when the lower esophageal sphincter (LES) weakens or relaxes, allowing stomach acid to move upward into the esophagus. This condition can lead to symptoms such as:
- Heartburn (a burning sensation in the chest)
- Regurgitation of food or liquid
- A sour or bitter taste in the mouth
- Difficulty swallowing
While occasional reflux is common, chronic or severe cases may indicate GERD, a more serious condition requiring medical attention. Diet plays a crucial role in managing reflux, as certain foods and beverages can trigger or exacerbate symptoms.
Is Apple Cider Acidic?
pH Level of Apple Cider
According to research, apple cider has a pH level ranging between 3.3 and 4.0, placing it in the moderately acidic category. Its acidity stems from natural components such as malic acid and citric acid, which contribute to its tart flavor. While not as acidic as citrus juices or vinegar, apple cider’s pH level can still pose challenges for individuals with sensitive digestive systems.
Acidity and Its Role in Reflux – Is Apple Cider Safe for Acid Reflux?
For individuals with acid reflux, consuming acidic foods and beverages can irritate the esophagus, particularly if the lining has already been damaged by repeated exposure to stomach acid. While some people may tolerate apple cider without issue, others may experience heightened symptoms after consuming it.
Potential Effects of Apple Cider on Acid Reflux
1. Irritation of the Esophagus
Apple cider’s acidity may exacerbate the burning sensation associated with acid reflux, especially if consumed on an empty stomach or in large quantities. The acid can irritate the already inflamed tissues of the esophagus, leading to discomfort.
2. Sugar Content and Digestion
Apple cider contains natural sugars, including fructose, which may contribute to bloating and gas in some individuals. This can increase pressure on the stomach, potentially triggering reflux episodes.
3. Alkalizing Properties Post-Digestion
Despite its initial acidity, some proponents argue that apple cider has an alkalizing effect once metabolized, which may help neutralize stomach acid. However, scientific evidence supporting this claim is limited, and individual experiences vary.
Tips for Safe Consumption of Apple Cider with Acid Reflux
If you wish to enjoy apple cider without aggravating acid reflux, consider the following tips:
1. Dilute with Water
Mixing apple cider with an equal amount of water can reduce its acidity, making it gentler on the stomach and esophagus.
2. Limit Portion Sizes
Consuming small amounts of apple cider—such as a few sips or half a cup—can help prevent reflux symptoms. Avoid drinking it in large quantities or on an empty stomach.
3. Pair with Low-Acid Foods
Combining apple cider with alkaline or low-acid foods, like bananas or oatmeal, can help balance its acidity and minimize potential irritation.
4. Avoid Sweetened Varieties
Opt for unsweetened apple cider to reduce the risk of added sugars exacerbating reflux symptoms.
5. Monitor Your Symptoms
Pay attention to how your body reacts after consuming apple cider. If symptoms worsen, consider reducing or eliminating it from your diet.
Alternatives to Apple Cider for Acid Reflux
For those who find apple cider too harsh on their digestive system, the following alternatives may be better suited:
- Herbal Teas: Chamomile and ginger tea can soothe the digestive tract and alleviate reflux symptoms.
- Alkaline Water: Helps neutralize stomach acid without triggering reflux.
- Coconut Water: A naturally low-acid beverage that provides hydration and digestive comfort.
Author Tip: 7-Day Meal Plan For Gastritis
Conclusion
Is apple cider safe for acid reflux? The answer depends on individual tolerance and consumption habits. While its acidity and sugar content may pose challenges for some, others may find it manageable with proper precautions. Diluting apple cider, monitoring portion sizes, and pairing it with low-acid foods are practical strategies for enjoying its flavor without discomfort. If symptoms persist or worsen, consult a healthcare professional to explore personalized dietary recommendations.
By understanding your body’s needs and making mindful choices, you can enjoy the occasional treat of apple cider without compromising your digestive health.
Related Posts


Subscribe for New Racipies
Get mental health tips, updates, and resources delivered to your inbox.