Raspberry Jam, Without A Recipe
I admit I don’t have a real recipe today. Because I didn’t exactly have any directions to follow, just some general guidelines put forth in this article.
In short, I made raspberry jam. Winged it. And it was overwhelmingly easy.

People approach jam making with trepidation because they associate with it Herculean levels of labor. I certainly did, enough that I never really figured out what exactly this labor involved; in my mind, it was a Cinderella-type effort, consisting of hovering over steaming vats of boiling jam and stirring, stirring, stirring. (Except Cinderella probably doesn’t sweat, does she?)
And then—and this is what really deterred me from the process—there’s the bit about canning, which requires doing something complicated-sounding to a line of jars. I don’t trust myself with avoiding botulism. In the first month that we were dating, I gave Chris food poisoning in the form of a tomato which I didn’t realize was moldy at the time.

So here’s the gist of Mr. Parsons’s article: when you make jam in tiny little batches at a time, say, with a couple pounds of fruit or less, the process is actually incredibly easy. Like, seriously easy. You could do it right before going to bed and right after getting up. Waiting for the jam to cool takes longer.
Other advantages: not having to deal with the pesky safety proceedings. After all, you’re not making jam to last you through the winter, just through next week.
Also, being able to be spontaneous—not only with deciding to make jam in the first place, but also with the creative license that comes from making small enough batches so that screwing up is not a big deal.


I discovered two 6-ounce containers of raspberries in the fridge, slightly moldy, some of the berries covered in dark spots (what are the spots by the way?). Those I tossed, the rest I decided to use in testing out this nouveau style of jam making. I think raspberries are absolutely adorable as jam, by the way. Their jewel-like seeds remind me of rubies.
So, I estimated that I started out with 12 ounces of raspberries, but tossed roughly 3 to 4 ounces. This left me with roughly 8 to 9 ounces. 8 ounces of sugar is roughly a cup, so I decided to reduce the amount to roughly 3/4 of a cup because I didn’t want too-sweet jam. I also threw in a handful of basil leaves.
Do you see where I’m going with this? I kind of sort of guestimated every step of the way and still ended up with a tiny jarful of bona fide raspberry jam. Note however that Parsons does caution that anything less than 35% by weight of sugar results in runny, concentrated fruit juice.
Have fun! And let me know what kinds of results you get. I’m eager to try making apricot jam next.

JAM
From the LA Times article California Cook: Making jam in small batches
Cut up and weigh your fruit (with stone fruit, weigh after removing the pits). Pour it into a pot along with an equal weight in sugar. With the heat on medium, let the mixture come to a boil, all the while stirring. Remove from heat, let it sit overnight. Covered, if you’d like.
Pour a cup or two of the mixture into a saucepan (preferably non-stick, but my regular saucepan worked fine). Turn your stove to medium-high and begin stirring. The jam should set within 5 minutes. Immediately remove it from the heat and pour it into a prepared container. And that’s it!
How do you know when the jam has set? First, you’ll feel it. While stirring the jam, you’ll feel the texture change from light and liquid to heavier and smoother.
But the surest way is by watching the way the jam falls from the stirring spoon. When you first start cooking the jam, it will come off in one stream, like water. When it’s almost ready, it’ll fall off in multiple streams, but still slightly liquid. Cook it 30 seconds or so more and you’ll notice that a sheet begins to form at the base of the spoon. That’s the moment.
According to Russ
Got it?
Pumpkin, Banana, & Apple Yogurt Smoothie

I am still on a pumpkin kick this week. I have been making a lot of fruit and yogurt smoothies lately, so I thought I’d make a pumpkin smoothie. I try to eat more yogurt, but I go through phases. Sometimes I will eat it for two weeks straight and then get sick of it and don’t eat it for a month.
When I am in my “I am so sick of yogurt” phase, I usually throw it in a blender with fruit and make a smoothie. It’s easier to slurp down with a straw and I am eating something healthy. It’s a win, win situation.
I just dump all the ingredients in the blender and turn it on. Simple, easy, and healthy. Ok so maybe the caramel is not so healthy, but I just had to do it. Besides, I only used a teaspoon.
This smoothie was a big hit. I gave it to my six year old daughter, thinking she would take a few sips and then not like the pumpkin taste. Instead she downed the entire glass all by herself while eating a pumpkin apple scone (recipe coming later in the week). So see, kids will love it too. I think the pumpkin and apple were a perfect match and the caramel added just the right amount of sweetness, without making it too rich.
Pumpkin, Apple, and Banana Yogurt Smoothie
by The Sweet Chick
Prep Time: 15 minutes
Keywords: breakfast beverage snack pumpkin apple banana yogurt
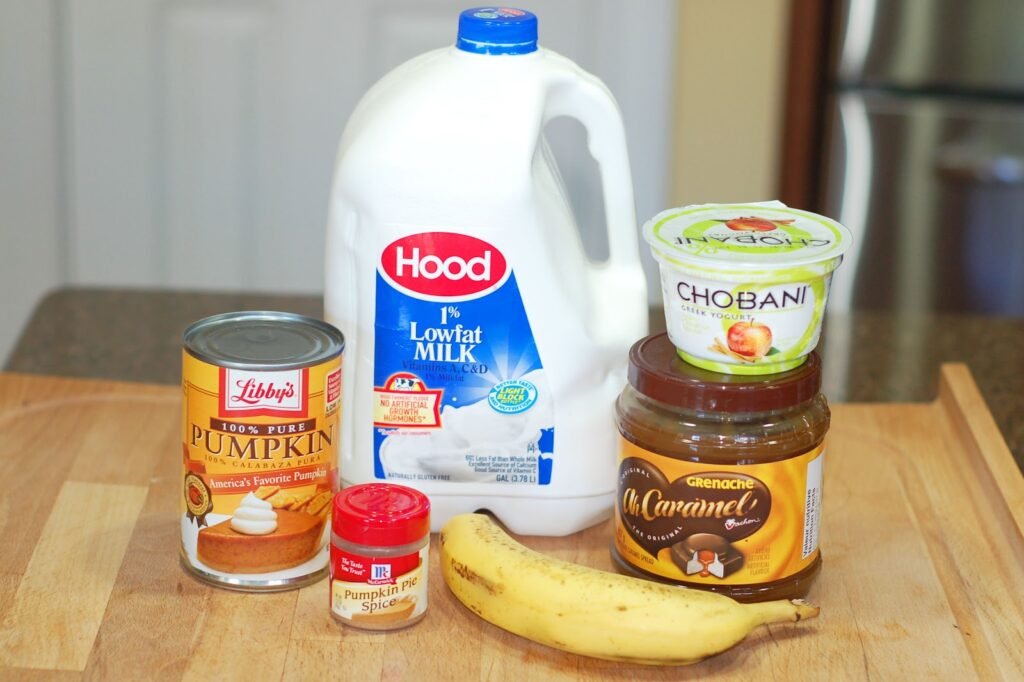
Ingredients (serves 2)
- 1 banana, chopped
- 1 6oz. container Chobani Apple Cinnamon Greek Yogurt
- 1/4 cup pumpkin puree
- 1/2 teaspoon pumpkin pie spice
- 1 teaspoon caramel (or caramel topping, or pure maple syrup)
- 1 cup milk
Instructions
Place chopped banana in blender.
Then add yogurt, pumpkin puree, spice and caramel.
Pour in milk and blend for 1-2 minutes, or until smooth and well mixed.
Pour into two glasses, add straws, and share with a friend. Enjoy!