Hazelnut Coffee Cookies

Well, my Mother’s Day didn’t quite go as planned. First the little guy caught some type of virus that started as hives all over his body, then led to a really high fever that took all day to get down, followed by head congestion and lethargy. And he was even kind enough to pass his germs along to his father and I. I was not in the mood to do anything on Sunday. Which was fine, because it was my day to relax anyway. I did receive some lovely gifts from the hubby and kids, which made things better. Kinda of like these Hazelnut Coffee Chocolate Chip Cookies made me feel when I first bit into one. They are truly spectacular. I am a big fan of the hazelnut/chocolate combo. I hope you are too, because these cookies are so easy to make.

As you can see, there are not too many ingredients. You can buy the hazelnut flour online or make your own if you have the time and the right tools. I bought the coffee extract at Walmart.

These cookies do not spread, so you will have to press them down a bit to flatten them out. I kept them on the thicker side, because I knew I wanted to be able to dip the bottoms in more chocolate.

Trust me, you are going to want to dip them in chocolate. It makes them taste like those Ferrero Rocher chocolates. I could eat a whole box of those chocolates.

Thank goodness this recipe only makes 15 cookies, otherwise I would be in deep trouble. The cookies came out soft, chewy, and full of chocolate and hazelnut flavor. They are moist, not dry. The coffee flavor is in the background. I may add a little more extract next time. Being that they are made with a nut flour, they are gluten free. Which is great for those with gluten allergies, but not for those with hazelnut allergies like my husband. Poor thing, he did try one, but then he got all stuffy.

To my surprise, the biggest fan of these Hazelnut Coffee Cookies was little mister picky himself. I thought the texture would throw him off. He’s not a fan of certain textures and the texture of these cookies is obviously ground nuts and not powder like flour. However, when little man asked for a cookie and I offered him his beloved Oreos, he declined and asked for one of mommies cookies. So much for having them all to myself. Needless to say, the cookies did not last long in this house.
Hazelnut Coffee Chocolate Chip Cookies
by The Sweet Chick
Prep Time: 10-15 minutes
Cook Time: 12-15 minutes
Keywords: bake snack dessert gluten-free healthy low-carb hazelnut flour chocolate chips cookie American
Ingredients (15 cookies)
For the cookies
- 1 1/2 cups hazelnut flour/meal
- 1/4 cup butter, room temperature
- 1/4 cup light brown sugar
- 1 egg
- 1 teaspoon coffee extract
- 1/4 teaspoon salt
- 1/4 teaspoon baking soda
- 1/4 cup semi-sweet chocolate chips
For the dipping
- 3/4 cup semi-sweet chocolate chips
Instructions
For the cookies
Preheat oven to 375°F
In a stand mixer, cream together the butter and sugar, until smooth.
Then add the egg and extract and mix well on low speed.
Next add the flour, salt and baking soda. Mix on low until completely blended.
Lastly, add the chocolate chips and mix until evenly distributed.
With a cookie scoop, place mounds of dough on a parchment lined cookie sheet about 2 inches apart.
Gently press down on the tops of the mounds to flatten them out a bit.
Place in oven and bake at 375 °F for 12-15 minutes or until golden brown. (Mine took about 12 minutes.)
Remove from oven and let cool a bit on the cookie sheet before moving to cooling rack to cool completely.
For the dipping
Place chocolate chip in a microwave safe container and heat in the microwave in 30 second bursts until completely melted, stirring in between heating.
Dip the bottoms of the cooled cookies in the melted chocolate and place on a sheet of wax paper.
Let the chocolate set at room temperature, or if you are in a hurry, place them in the fridge for a few minutes.
Notes
Cookies can be kept in a airtight container at room temperature for up to 5 days.
Spelt Focaccia With Rosemary, Garlic, And Pecorino

I made buttermilk pancakes the other day and substituted a little of the all-purpose flour for spelt. They were so good! It made me realize that it’s been a long time since I baked with whole grain flours (hard to believe that it had been my sole obsession three years ago). Also, yikes, I just realized the last recipe featured on this blog containing a flour other than all-purpose was way back in November! They’re really good cookies by the way.
I decided to remedy this immediately. As usual, I pulled out my battered copy of Good to the Grain. The recipes coupled with the photography always fill me with this longing to lead a more wholesome life, with no greasy take-out food, no indoor pants, and fresh air coursing through the rooms at all times. Let’s address why these are impossibilities.
First, there’s no way I could do away with my comfort food burritos, which are filled to the brim with rice, beans, meat (MEAT), and other stuff that’s good for the soul but not so much for the waistline (it feels weird writing about waistlines, as I don’t think I’ve ever given mine any proper thought). Secondly, I hate wearing jeans, which is something about me you would never guess because I ALWAYS WEAR JEANS. But it’s true. I’d much rather have my legs be swathed in loose, silky, comfortable pants when there’s no one to impress.
And finally, it’s still 40 degrees out, yo! Despite the fact that both Chris and I think of our heating as the devil because it makes the apartment unbearably stuffy, it only turns on twice a day, so to open the windows would be wasting the heated air.
I think the point I’m trying to make is that the healthful life I dream about is probably largely illusory. Though I enjoy baking with whole grain flours, and eating vegetables with all my meals (well, not breakfast—I do give myself a break then), and going to the gym thrice weekly, I’m not perfect.
Anyway, the focaccia called to me.
Spelt foccacia is less springy than regular foccacia, of that I’m sure. Since spelt contains low amounts of gluten, doughs containing it don’t rise as well and result in a lack of the same effervescence as all-purpose doughs. Hence, a slightly denser texture and less sticky.
On the other hand, spelt has a great flavor that I think came through in this recipe. It was kind of hard to tell, with such strong-flavored toppings all competing for attention, but I detected a wheat-flour like taste, with that signature nuttiness I really love.
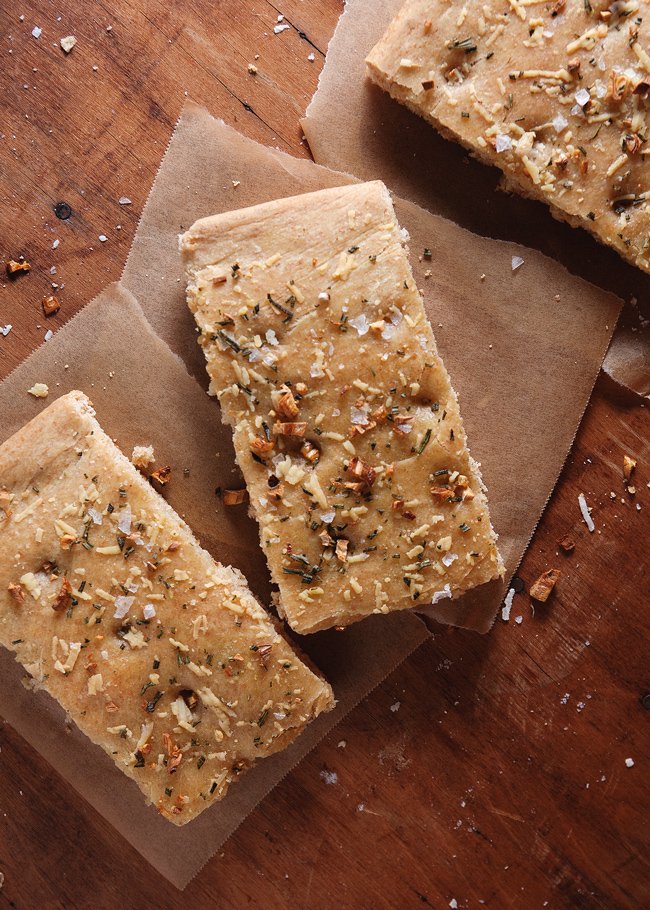
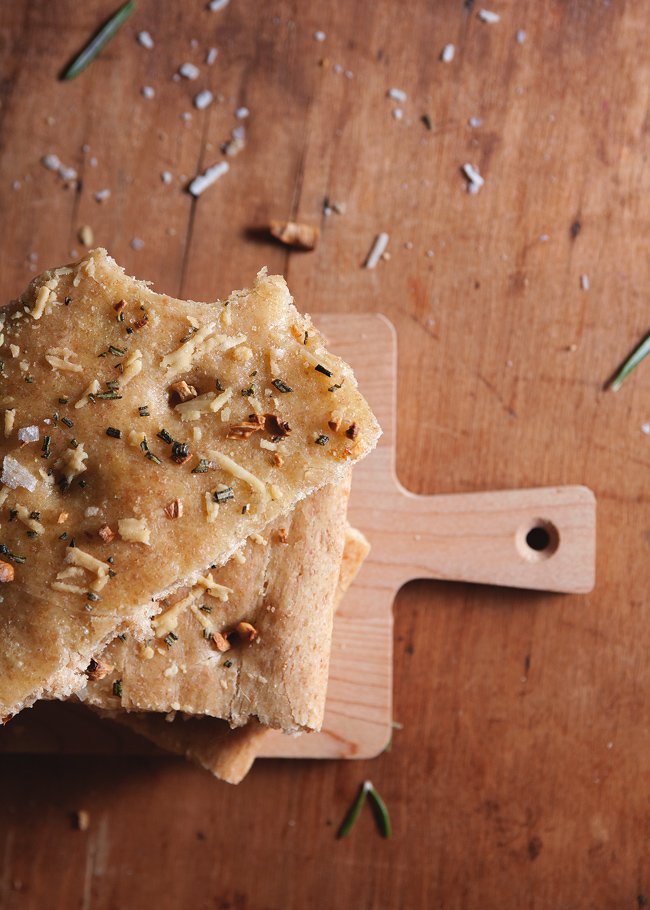
What disappointed me the most about this recipe was probably due to the overall crappiness of my oven, but my focaccia refused to golden-brown properly! Very disappointing, especially because, I’d kept it in there for so long that the garlic and rosemary started burning. It’s alright. I don’t think the taste suffered too much, but it made for a slightly less attractive presentation.
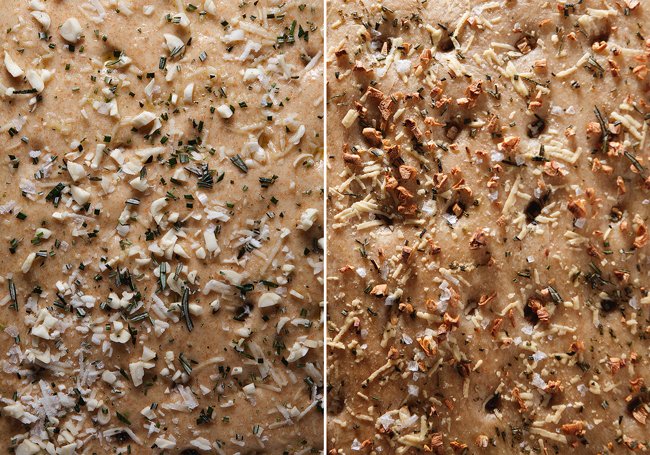
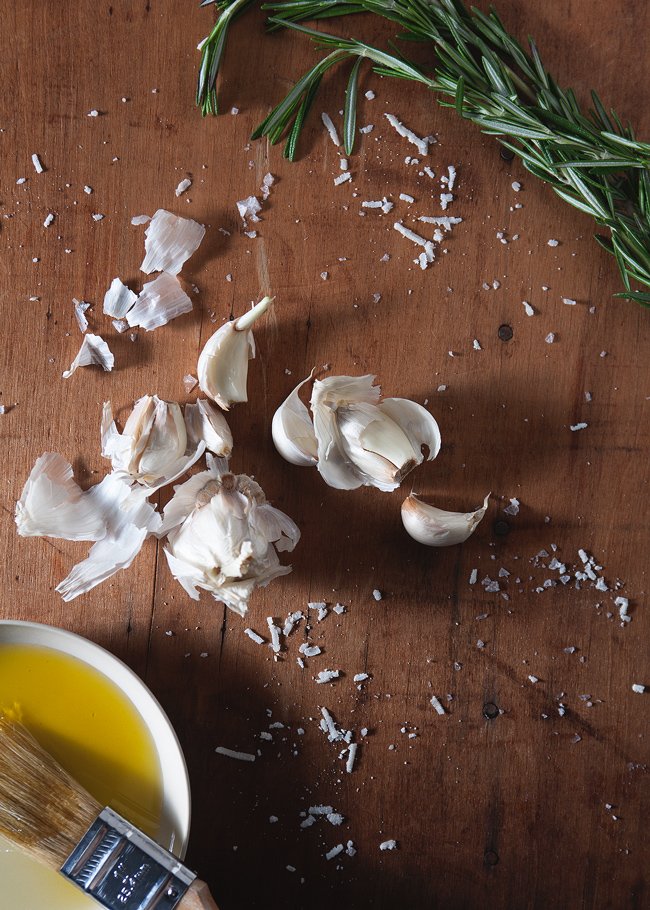
I don’t need to tell you what to do with focaccia. Neither do I need to tell you how to top it. But, I will add, rosemary is one of my favorite herbs, and it really suits breads, spelt, and garlic and pecorino. With that said, a simple sea salt topping would be enough to make me a happy sailor, and I would gladly eat this focaccia in any form it was offered. In my case, it went perfectly alongside leftover soup (third batch and still going strong), always a winning combination.
(I should also add, I accidentally bought 2 pounds of active dry yeast, so I think I’m going to take up bread-making as a hobby for the foreseeable future. Focaccia is only the beginning, my friends!)
SPELT FOCACCIA WITH ROSEMARY, GARLIC, AND PECORINO
Adapted from Good to the Grain
Makes 1 rectangular focaccia
Ingredients:
1 package active dry yeast (2-1/4 tsp)
Pinch of sugar
1 cup spelt flour
2 cups all-purpose flour, plus more for kneading
1 T kosher salt
1/4 cup plus 2 T olive oil (plus more for greasing)
garlic, herbs, spices, coarse salt, cheese, and any other toppings of choice
Directions:
Lightly rub a large bowl with olive oil. Add 1-1/4 cups of warm water, yeast, and sugar to another large bowl. Stir, and allow the yeast to bloom for about 5 minutes (should start bubbling). Add the flours, salt, and 2 T olive oil and stir to combine. Pour the dough onto a lightly floured surface and begin kneading, adding up to 1/2 cup of all-purpose flour if needed (depending on the manageability of the dough, as it’s quite sticky). Knead for about 10 minutes until the dough is elastic and supple (you’ll start to feel the difference—just keep kneading!)
Put the dough in the oiled bowl, turning it so it’s lightly covered with the olive oil. Cover with a towel and let rise for about 2 hours, or until doubled in size.
Generously oil a baking sheet with olive oil. Place the risen dough onto the baking sheet and stretch it so it fills the pan. Dimple it with your thumb, then cover with a towel and let rise for about an hour.
Preheat your oven to 400 degrees F. Now it’s time to top the dough. First, brush a 1/4 cup of olive oil onto the dough, then sprinkle with the toppings of your choice. Bake for 22 to 25 minutes until golden brown. Allow the bread to cool slightly before slicing and serving.
As a note, you can store the dough in the fridge after the first rise. Just cover it tightly with plastic wrap and make sure to let it come to room temperature before continuing on with the recipe.